Showing posts with label my home series. Show all posts

Friday, July 3, 2015

House to Home: Master Bathroom

I've been saying for years that I need to start decorating my home.  I have a lot of trouble settling on what I really want when it comes to making our house a home.  I don't go for a modern look.  It's just not me.  {That's one of the great things about each of us having our own spaces to work on, I guess.} I'm more a cosy, comfortable, traditional kinda gal.

One day it hit me - I was living in my house of 5 years and I really hadn't made it a home yet!  So, I got started.

Of all the rooms I decided to tackle first, I'm really not sure why I went with the master bathroom.  Maybe because it isn't seen/used by many others besides my husband and myself.  I could get the tools and supplies out and not have to worry about putting everything out of little ones' reach whenever I had to stop for the day.

Whatever my reasoning, or non-reasoning, that's where I started.

Here's a few before pictures! (Have to have those, right?) These were taken on our initial walk through before purchasing.
Tub and Shower Area

Sink Area
It's not bad.  It's actually a really great bathroom with lots of room and beautiful fixtures.  I can't take any credit for the choices made, though.  The people who built the house and then didn't complete the purchase, did a great job picking them out.

Soon after moving in, we realized the lights over the vanity weren't going to cut it in lighting up our whole bathroom.  This fixture was found one night while wondering through one of our favorite home stores on clearance for about $25.

Thankfully, Hubby is very handy and was able to run a new line and box to the area where we wanted the light all by himself.  {Really there wasn't enough space in the small attic crawl space for both of us to fit.  And... I wouldn't have been any help anyway.}  It's even on a separate switch!

Things kinda stalled at that point.  Life has a way of creeping in and taking over completely - we had another little one, kids started school, lasting medical issues, and many more just everyday things.

Fast forward to my little epiphany about not having a home, and I quickly got a gallon of paint in Gobi Desert, unearthed all my tools from the basement, and got started.

Yep.  Neutral.  Not exciting; but, I feel that I will be able to switch out accent colors as I want.

Current accent color?  White! With a bit of black thrown in.

Tub After

Sink After

Shower


Behind the door I have a couple of hooks to hang our towels on.


When the decorating started, I made this no-sew valance for the large window.


I liked it, but I really like this and it's more what I originally had in mind.  Cafe rod and window scarf were both purchased from Walmart.


These wrought iron wall decorations I've had for years, and they fit in perfectly on this side wall.  The towel rod is Sienna by Moen - very pretty and easy to put up.


Overall, I am soooo pleased with the results!  It's simple, relaxing and uncluttered.

Sink Before and After

Tub Before and After
Now on to the next room!


Friday, June 19, 2015

House to Home: Dresser Redo

Last week was a great, productive, week for me.  So many projects, big and small, completed in such a short amount of time.  (I'm now looking back on the time before I had kids and wondering how I could have possibly wasted all that time!!)


First project up for your viewing pleasure is this lovely dresser.  Well, this is how the dresser started.  Can you see it?


This is the only picture I could find of a 'before' shot.  Here's a little closer.


Basically, it's a six drawer dresser that is about 34" high and 46" long.

This dresser has been in our family for years.  That fact would make you think it's a prized antique.  Um..... it's not.  It's just old.

I had it in my room growing up and my parents were nice enough to let me have it when I got married.  (I think my mom may have even had it when she was growing up.)  Maybe not the most attractive piece; but, free is always great when just starting out right?

I finally got the go ahead from Kevin to overhaul the dresser in the summer of 2012.  I think?  Or maybe I just decided I wouldn't be in trouble for cutting it apart at that point.   Because, you know, once the drawers start to fall apart and the remaining drawers make awful squeaking noises when being pulled out or pushed in, you no longer have to worry about really messing things up.

Anyway.... This is how far I got that summer.


The kids were getting ready to start school, life was busy and we ended up getting blindsided by some medical issues, so the dresser got put on the back burner.  (Read more about all that on Madi's Milestones. Link to first post.)

Not to say that those three years leading up to today were all hunky-dory, but I'm glad I wasn't able to  finish the dresser before now.  The darker the surface, the more dust and dirt shows.  And black shows everything!

So I decided to go with the color white when I picked up my paint brush last week.  No dust showing on that surface!


I covered the dresser with 3 coats of Behr Premium Plus Paint & Primer in One in Ultra Pure White from Home Depot.  Both a brush and small roller were needed to do the project.

Obviously, the inside needed to be painted since it all showed.  This really sucked up a lot of the paint, but having a 'paint and primer in one' helped to get the coverage needed.

I also skipped painting the areas that wouldn't be seen unless you are sitting or laying on the floor.  (Just stay on your feet if you come visit, m'kay?)


You can still see the grooves from the original construction where the front drawer supports were.  I decided to leave them as is instead of filling with wood filler.  Adds a little charm to it - at least, that's what I'm telling myself. 


This is the new home for this piece.  It fits just about perfect along a short wall toward the back of our living room.  

To make it useful and not just pretty (ha!), I had several bins on hand that fit perfectly.


These little fabric bins were purchased from Target when I first started on the project.  I already had a vision in mind and knew if I waited I wouldn't be able to find them later.  (I have no idea if they are available in the store, but I couldn't find them online anywhere.)

I also found some Threshold Milkcrate Decorative Baskets at Target on a different trip.  They've worked great as toy bins in our living room for a year or so.  Nice and roomy storage, but don't scream 'toy bin' when you see them in the space.


All the bins fit perfectly in the space!


In the small bins, we have puzzles for the younger kids.  The big two house all the Duplo Legos.


I took one of the lamps that we rarely use and set it on top.  Little by little, I'm sure I'll fill the space, but for now I'm pretty content.  Family pictures will be printed off and used to cover the wall above the dresser, too.  That will be done with a couple of friends who have a better eye for that kind of thing, though.

So, this is where we are right now.


So pleased with the results!!  Let me know what you think!


Thursday, May 7, 2015

Laundry Room Potential

We've been in our home for about 6.5 years now.  And ever since our belongings were delivered from Georgia, our standup freezer has been next to the washing machine in our laundry room.

Recently, Kevin moved it from that space and parked it in our basement for me.  What a change! The room seems so much bigger now even though it really isn't all that big.


There's so much potential for this space.  I have a tall bookcase from IKEA that would fit perfectly in this newly emptied space that could hold extra small kitchen appliances or be used to hold extra grocery items.

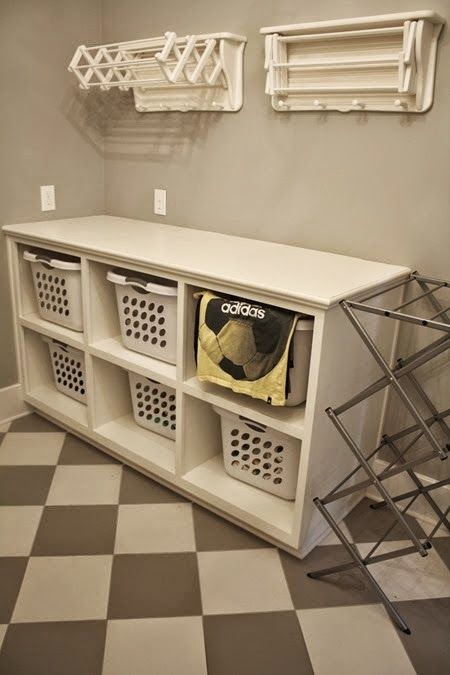
This tower of laundry baskets could be a huge help, too.  Well...... as long as we use the baskets.

 Or maybe a smaller version of this so I have a surface on which to fold laundry.


We've also thought about going completely crazy and moving the washer and dryer to the basement.

That would leave the current laundry room open to become a walk-in pantry like this.


Or maybe a mudroom where we could put all the kids' backpacks and paraphernalia that is currently cluttering up the dining room and foyer at the front door.

Something elaborate-

Or something simple-


Or maybe something in-between -


Like I said, there's a lot of potential.  Of course, once we figure in budget and time, we may not be able to do much of anything.  And that's okay.  I enjoy the dreaming process!  What would be your dream?  Do you have a mudroom to catch all the kid clutter?  Or do you think it would be better to keep the laundry room on the main floor?


**All sources for the above pictures can be found on my Pinterest boards: Laundry Space, Mudroom,  and Pantry.
Related Posts Plugin for WordPress, Blogger...